Online & Mobile Banking
Access Your Accounts 24/7 with Citadel's Online & Mobile Banking
Built for Your Financial Well-Being
Citadel’s Online & Mobile Banking makes it easy to see your account balances, transaction history, and make transfers whenever you need to. You can also open new checking accounts, savings accounts, and loans. Whether you’re using Online Banking in a web browser, or if you download the Citadel Mobile App for your Apple or Android mobile device, you get a single, streamlined view of your finances and great online banking features all in one place.
The Citadel Mobile App is also compatible with Apple Watch and other wearable devices, so you can view account balances, recent transactions, and more.
Key Features You'll Love:


Learn more about the new platform.
Learn MoreSee How It Works


-

 0:50
What's New - Online and Mobile Banking
0:50
What's New - Online and Mobile Banking -
0:51
Switch & Manage Direct Deposit with Ease
-
1:09
How To Manage Your Credit Score
-
0:48
How To Make a Mobile Deposit
-
1:24
How To Set Up Card Controls
-
1:01
How To Set Up Account Alerts
-
0:42
How To Access Card Services
-
0:42
How To Customize Your Dashboard
-
1:26
How To Check Your Financial Health
-
0:53
How To Switch Account Profiles
-
1:12
How To Make a Loan Payment
-
2:00
Business Online Banking
Looking for Business Online Banking? We have that, too.
Learn MoreFrequently Asked Questions
To enroll in Bill Payer, simply select the 'Bill Payer' option from the main menu and start adding your billers to schedule payments immediately.
Yes, select 'Travel Notices' from the 'Card Services' menu to inform the credit union of your travel plans. You can select your start and end date, which cards you would like to include as well as destination and if Domestic or International travel. You can also manage your scheduled travel notices from this screen.
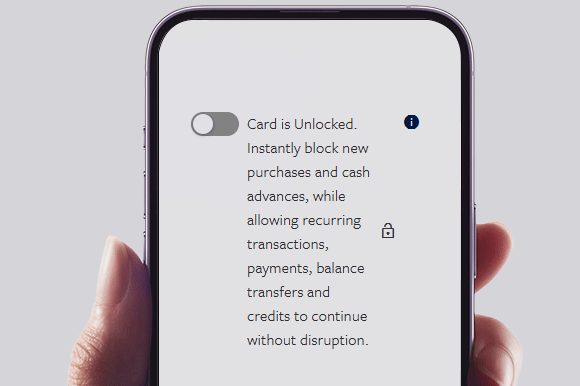
Using Card Controls with your Citadel debit or credit card can provide you with peace of mind and help you secure your financial information. You can easily lock or unlock your card, set travel notices and card alerts, and more, all with just a few clicks or taps.
Watch this video on How To Set Up Card Controls or follow the instructions below.
To access these controls, log in to your account in Online & Mobile Banking. If you are not registered for Online & Mobile Banking, you can enroll here.
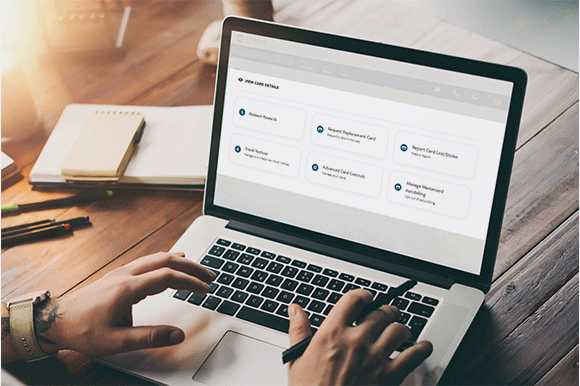
1. Select the account the card is associated with from the menu. Debit cards are attached to checking and Star Savings accounts, Citadel credit cards are listed under Loans & Credit.
2. Look for the Card Services tab, located directly above transaction information for that account.
Note: If you do not see the Card Services tab, check the account you are accessing. Debit cards are only connected to checking and Star Savings accounts. They are not connected to other accounts such as High Yield Savings or Certificates.
3. You will now have the option to lock and unlock your cards, report your card lost or stolen, set up travel notices, and more.
Check out this article on Credit Card Security Features and be sure to visit our Security Center for more information on how to protect your identity and accounts.
Its easy to activate your card, simply follow the steps below. Please note that the activation button will only be displayed for cards that are eligible to be activated.
- Debit Card - select your Checking account and choose 'Card Services'.
- Credit Card - select your credit card and choose 'Card Services'.
You can report your Citadel debit and credit cards lost or stolen by accessing the Card Services menu from the account dashboard in Online & Mobile Banking.
- Select the account the debit card is attached to, or your credit card account
- Tap the Card Services icon, then Report Card Lost/Stolen
- You may request a new card to be sent automatically
You can also temporarily lock your card to prevent unauthorized transactions by using the toggle switch.
eStatements, Billing Notices, and all additional Documents are accessible through the 'Documents' link under 'Quick Links'. You can also access by choosing 'Documents and Statements' from 3-dot ellipses menu for additional items. You can manage your Preferences and turn off paper statements to save $2.oo per month statement fee.
To manage your paperless settings, please follow these steps:
- Select 'Documents' from the Quick Links menu on the Dashboard in the desktop experience.
- Choose 'Paperless Settings' from the menu.
- For Mobile Banking, choose 'Paperless Settings' from the Documents and Statements menu.
We do not obtain the credit report of any user who is less than eighteen (18) years of age.
You can manage both your Overdraft Protection and Courtesy Pay options in Online & Mobile Banking.
From the 3-dot ellipses menu, choose 'Overdraft Protection'. You are able to select Overdraft Options for your accounts as well as opt in or out of Debit Card Courtesy Pay.
Citadel’s Online & Mobile Banking supports integration with Web Connect for QuickBooks, and Web Connect & Express Web Connect for Quicken.
Quickbooks for Mac
How to set up an account for Online Banking with Web Connect:
1. Log into Citadel’s Online or Mobile Banking
2. Export your transactions to a .QBO file and save to your computer
3. Open Quickbooks
4. Choose Banking menu > Downloaded Transactions > Import File
5. Navigate to and select the file you exported in Step 2, then click Open
6. Click Select an Account for each account and choose which account in QuickBooks to connect it to. If you do not yet have an account in Quickbooks to connect with, you can select New to create a new account
- After creating the new account, you may need to click Select an Account again and select the new account
7. Click Next
8. Click OK to confirm and finish
How to update an account with Web Connect:
1. Choose Banking menu > Downloaded Transactions
2. Select the Web Connect account you want to update in the upper left corner. Then click Download
- Note: For Web Connect accounts, Quickbooks will open Citadel’s Online & Mobile Banking. Please log in and export the .QBO file for the account being updated. Alternately you can log into Citadel’s Online & Mobile Banking outside of Quickbooks and follow the same steps below
3. When exporting the .QBO file you will be given the option to open the file or save it
- If you open it, Quickbooks will take over and begin the import process
- If you save it, you can import it later by using the Import File button
4. Quickbooks will then import the online banking transactions
5. Once complete, QuickBooks will give you a count of how many transactions were imported. Click OK to proceed
6. Quickbooks will then return to the Downloaded Transactions window and open the register for the selected account so you can begin the transaction matching process
Quickbooks for Windows
How to set up an account for Online Banking with Web Connect:
1. Log into Citadel’s Online or Mobile Banking
2. Export your transactions to a .QBO file and save to your computer
3. Open Quickbooks
4. Choose Banking menu > Bank Feeds > Import Web Connect File. You will see an import dialog
5. Navigate to and select the file you exported in Step 2, then click Open
6. Click Use an Existing QuickBooks Account if you have an appropriate account in the Chart of Accounts. If you do not have an account yet, click Create a new QuickBooks account and enter a name for that account
7. Click Continue
8. Click OK to confirm and finish
How to update an account with Web Connect – Bank Feeds:
1. Choose Banking menu > Bank Feeds > Bank Feeds Center
2. Select the account you want to update in the Bank Feeds window
3. After you select the account, click Refresh Account to start the update process
- Note: For Web Connect accounts, Quickbooks will open Citadel’s Online & Mobile Banking. Please log in and export the .QBO file for the account being updated. Alternately you can log into Citadel’s Online & Mobile Banking outside of Quickbooks and follow the same steps below
4. When exporting the .QBO file you will be given the option to open the file or save it
- If you open it, Quickbooks should open and begin the import process
- If you save it, you can import it later by going to Banking menu > Bank Feeds > Import Web Connect File, navigate to the exported file then click Open
5. Quickbooks will then import the online banking transactions and show you a Transmission Summary
6. Review the Online Transmission Summary. You can print the summary or click Close when done
7. After the Web Connect import, go to Banking menu > Bank Feeds > Bank Feeds Center, select the account, and click Transaction List to view and match the downloaded transactions
Quickbooks Online
How to add an account using OFX Web Connect:
1. Log into Citadel’s Online or Mobile Banking
2. Export your transactions to a .QBO file and save to your computer
3. Log into QuickBooks Online
4. On the sidebar menu, go to Transactions > Banking
5. Find the Update button on the Banking page and click on the menu arrow
6. Click File Upload > Add Account
7. You will see the Import Bank Transactions window. Click Browse, and choose the file you exported in Step 2
8. Quickbooks Online will prompt you to either associate an account or add a new account. Choose your option and click next. Quickbooks will import the .QBO file and create your account
How to update an account using OFX Web Connect:
1. Accounts you set up using a Web Connect file will not update automatically. To update the data in those accounts, simply log into Citadel’s Online & Mobile Banking, download a current .QBO file, and import it using the process you used to create the new account
Quicken for Mac
How to set up an account for Online Banking with Web Connect:
1. Log into Citadel’s Online or Mobile Banking
2. Export your transactions to a .QFX format and save to your computer
3. Open Quicken and choose File > Import > Bank or Brokerage File. You will see an import dialog
4. Navigate to and select the file you exported in Step 2, then click Open
5. Click Link an Existing Account if you have an appropriate account in the account list. If you don’t have an account yet, click Create a new account and enter a nickname for that account
6. Click Import
7. Click OK to confirm and finish
How to set up an account for Online Banking with Quicken Connect:
1. Choose Add Account on the sidebar
2. Select the type of account you want to set up
3. After you select the type of account you want to add, you will see the financial institution selection screen. Type Citadel to locate in the list
4. Select Citadel and click Next
5. Quicken will now display the login screen. Enter your Citadel log in credentials and follow the prompts to add your accounts to Quicken
Updating accounts with the One Step Update in Quicken for Mac:
1. After an account has been set up for online banking, you can use the One Step Update to update information. Just click Update Accounts in the Quicken sidebar
Quicken for Windows
How to set up an account for Online Banking with Web Connect:
1. Log into Citadel’s Online or Mobile Banking
2. Export your transactions to a .QFX file and save to your computer
3. Open Quicken, then choose File > File Import > Web Connect File. You will see an import dialog
4. Click Link an Existing Account if you have an appropriate account in the account list. If you don’t have an account yet, click Create a new account and enter a nickname for that account
5. Click Import
6. Click OK to confirm and finish
How to set up an account for Online Banking with Express Web Connect:
1. Choose Tools > Add Account
2. Select the type of account you want to set up
3. After you select the type of account you want to add, you will see the financial institution selection screen. Type Citadel to locate in the list
4. Select Citadel and click Next
5. Quicken will now display the login screen. Enter your Citadel login credentials and follow the prompts to add your accounts to Quicken
Updating accounts with the One Step Update in Quicken for Windows:
1. Choose Tools > One Step Update
2. Enter the necessary information for the listed account (such as Username and Password) and click Update Now
3. Follow the instructions to update your accounts
Exporting Files from Citadel’s Online Banking
How to export files from Online Banking for Quicken or Quickbooks:
1. Log into Citadel Online Banking. Please note: exporting account history is only available on the web version of Online Banking and cannot be completed in the Citadel Mobile App
2. Select the account you wish to export from the dashboard
3. In the Quick Actions menu, click More > Export
4. Choose File Format: .QBO for Quickbooks or .QFX for Quicken
5. Enter date range for transactions you’d like to export
6. Click the Export button
7. Save the exported file to your computer
8. File may then be uploaded to Quickbooks or Quicken as outlined above
Yes, you can manage your mailing address and change from your Profile, under your login icon image. Then select 'Address' from the User Settings menu. Please note that you will need to change the address back once the desired timeframe has completed.
There is currently only one phone number that Citadel will use to send you alerts or Secure Access Codes. We encourage you to add this number to your contacts as the alerts and validation codes are issued. The phone numbers is: 866-755-2936
Below is a list of the supported browsers and mobile operating systems for Online & Mobile Banking. The two most recent operating systems are supported on Android and iOS. Older versions may continue to work, however they may not function properly. For devices on Android 12 or older, app downloads and updates are not available at this time. While downloads and updates are currently still available with Android 10 and 11 and 12, there may be issues when used in conjunction with outdated versions of the supported browsers below (specifically Chrome). We recommend users update the embedded browser on Android devices to Chrome 111 or higher.
For users with iOS, app downloads are available at version 15 or above. Users with 14 or below can continue using the version they have, but installing an update or new app will require 15 or above.
| Browsers |
Windows |
Mac OS X |
| Google Chrome (Current and previous two versions) |
Recommended |
Recommended |
| Mozilla Firefox (Current and previous two versions) |
Supported |
Supported |
| Microsoft Edge (Current and previous two versions) |
Supported | Unsupported |
| Safari (Current and previous two versions) |
Unsupported |
Supported |
| Mobile Operating System (OS) | Apple | Android |
| iOS 15 and above | Supported | N/A |
| Android 13 and above | N/A | Supported |
Still have questions? Visit our help center.